How our garden grows
Week 8
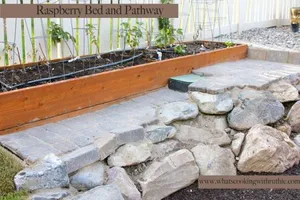
We’ve wanted raspberries for well over 2 years now and we just hadn’t gotten around to getting it done… sad because we could be enjoying them this year!! BUT, finally this is the year! We took lots of pictures so we could show ya how to do build your own garden beds!
Here is the spot of ground where we decided to put our raspberries! The grass never grew well here and it’s hard to mow plus it was close enough to the other garden beds that we could tap into the sprinkler system!


Future spot for raspberry bed
We killed the grass and weeds with Round Up about 2 weeks before we planned to start digging!
Getting started:
SO, to get started we made a trip to the lumber store! There we bought pressure treated wood because it won’t rot or get eaten by insects. Try to get lumber that fits the dimensions as close as possible to the beds your planning to build. Our raspberry bed was going to be 12 feet long and 4 feet wide so we bought 1- 2x12x12 and 1- 2x12x8 and since our bed was being built on a decline and against a fence so we used 1- 2x6x12 for the back.


Buying wood for raspberry beds


And you’ll also need a corner brace for each corner and we used coated deck screws so they won’t rust 🙂


Assembly:
To assemble the garden bed find a flat level surface (we used our driveway), cut the boards to size and set them up on their side edge, using 4 inch deck screws, fasten the 2 boards together.


Start assembling bed by screwing ends of the boards together
After all 4 corners are fastened together making a box, reinforce the corners with Simpson brackets (Simpson brackets are zinc coated so they won’t rust easily!) and a 1 inch coated screw through each hole …


1 inch coated screws and simpson bracket


Using 1 inch screws attach the bracket to the boards by putting a screw through each hole
Attached corner bracket… now repeat for every corner!


Attached corner bracket
If the bed your building is longer than 6 feet make sure and put a reinforcing dividing board in the center of the bed so it won’t eventually bow out.


Center divider to prevent eventual bowing
Some of our beds are 3 feet tall, this makes them easier to harvest and care for but it also makes them 3 times as expensive to build. Because of the weight involved the corners need even more reinforcement. These beds are 8 years old and will look to last another 8-10 years. Use 6×6 posts for the corners and used hot dipped zinc coated lag bolts and fender washers to build them…


3 feet tall beds in our back yard


close up picture… Drew built these boxes 8 years ago
Once our new box was assembled, we took it back to the spot in our yard where the new bed was going, we spray painted the outline on the grass to make it easier to know where to dig… we also used cement blocks to secure the lower side of our new bed since it’s on a decline.
We set the box in place to spray paint trace the ground for digging…


Setting the garden box in place to spray paint trace for digging
Here’s a picture of the black spray paint line for digging…


Spray paint the outline for digging
Then get out the shovel and maybe a pick and start diggin’…


Dig out the area where the bed will go
Dig out enough dirt so the bed will sit somewhat level…
Here’s a picture of the cement blocks we used to sure up the low side of the garden box because it’s sitting on a decline we thought it’d be stronger and more level…


Cement blocks used for helping to level the garden box


Garden box in place
The next step for us because the fence is on a decline (if your box is on level ground this wouldn’t be necessary) was to secure it by wiring the garden bed to the base of our fence with 18 gauge wire…


Secure the garden box in place with wire
We evenly spaced out 3 wire ties along the back of our box 🙂
Next week we’ll cover tapping off the sprinklers, filling the box with dirt, planting our new raspberry bushes, and we’ll show you the way we’ve finished off this space (which means we need to hurry and finish it off!!) If you’ve wondered about do it yourself garden boxes then I hope this post is helpful!! They sure are an awesome way to garden plus they help keep the weeds and bugs to a minimum AND that’s always nice!!
Love,
Ruthie
Recommended Posts


[…] How our garden grows… (week 8) we walked you through how to build a raised garden bed! And in this post we’ll show you how […]