How our garden grows
Week 5
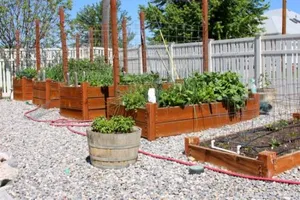
This past week we’ve been working on getting our watering system up and running AND also making some Vegetable Trellises for some of our plants to grow on! We’ll show how we made each of these this week 🙂
Watering System:
In our area we have secondary water which is basically river water piped to each house. It’s great to have plenty of relatively inexpensive water for use in the yard! (our water bill much appreciates it!) But, there are a couple of draw backs… the city filters out the big stuff (ie: twigs, rocks, debris) in addition each home has to have an additional filter on their sprinkling system and we have an even smaller filter on our garden bed drip system.


Additional small yellow filter on the zone for the garden beds
Inside this box is also a pressure reducer, to keep the pressure low enough not to blow the drip lines:


Pressure reducer is at the bottom, filter with cover on is next, and then main valve
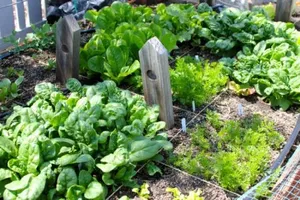
Each of our beds is set up with a drip line system that waters only where the line runs this has several benefits, the biggest being weed control! Weeds can’t grow without water and if the water is only going to the base of each plant instead of watering the entire bed, then the weeds won’t be able to survive 🙂


Drips of water from the drip line
We get our drip line components from Berry Hill Irrigation.com, who normally work with large farmers but are happy to work with smaller gardeners as well. Each bed has PVC pipe that runs from the filter and the pressure reducer into each individual garden bed. Then we buy the fittings that attach the drip tape to the PVC pipe, but they’ll help you with all of that information at Berry Hill. We buy 15 mil drip tape, which is the thickness of the plastic. (we get the most heavy duty cuz we use it for several years). We buy the drip tape with emitters/holes every 8 inches. Be sure and buy 8 inch or 12 inch emitters for a normal garden.


PVC line running from main sprinkler line to bed with fittings for drip tape attached


15 mil drip line tape from Berry Hill Irrigation


Fitting for drip tape
You can use landscaping staples or simple wooden stakes to control where the drip tape runs in the bed. We buy the most heavy duty drip tape so it only needs to be replaced about every 5 years.


Use wooden stakes to hold the drip tape in place for a small bed
Using the drip tapes also ensures we won’t waste water because each little plant only gets the water it needs without watering the whole bed! We can also change the volume of water bed by bed by either turning that garden bed’s individual valve or increasing/decreasing the amount of time on the sprinkler controller.


Valve to control water to each bed


Here you can see each small valve box for each bed
You can go as far purchasing a fertilizer injection system to use with this drip tape BUT that’s more a farm use and we don’t do that!
Vegetable Trellis
Vegetable Trellis otherwise known as hog wire on T-posts 🙂


Vegetable Trellis
All you do is buy some hog wire, some T-posts, and 14 gauge wire at your local Cal Ranch store! (or whatever farm supply store is by you!)


Hog wire and T-posts
Using a T-post driver or a sledge hammer pound T-posts into the ground
Then attach hog wire to T-posts with 14 gauge wire or bailing wire or T-post clips if ya got ’em 🙂


Attach hog wire to T-post using 14 gauge wire in 2 or 3 places
This greatly helps in growing cantaloupe, beans, tomatoes, cucumbers, tomitillos, even butternut winter squash if it doesn’t get too heavy. Vegetable Trellises keep the produce from bugs, slugs, and mildew. Also this system makes it much easier to harvest because nothing can hide. You can grow a lot more in a lot less space using vegetable trellises!
In the back yard we have some Vegetable Trellises built with wooden posts instead of T-post but the idea is the same:


Vegetable Trellis built with wooden posts
Well, that about does ‘er for this week of How our garden grows 🙂
Happy Gardening!
Recommended Posts


[…] our vegetable trellis we put up in week 5?? Here’s a picture of the cucumbers at about 2 weeks after transplant, the leaves in front […]