Our cute friend Dru from Polkdot Poplars has brought the CUTEST tutorial to share with us today…
I’m totally loving her Paper Feather Tutorial so much… what a creative way to decorate for autumn!
I’ll turn it on over to her:
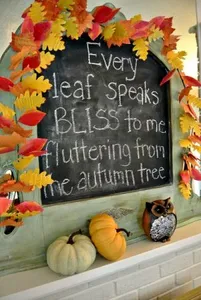
Happy Fall Y’all! I am so enjoying the cooler weather, the changing leaves, and the thought of the holidays around the corner. Do you believe it’s already that time of year?
I finally completed my Halloween decorations which is a first for me. I’m usually waiting until the last second. While I’m on a roll I decided to get a head start on Thanksgiving. I don’t think I’m going to do much other than some pumpkins, leaves, and these paper feathers I’ve been making. Feathers and arrows are such a fun current trend. Here are a few I’ve finished that I think I will keep in my decor even after Thanksgiving.


Here’s what I did:


I lightly sketched the feathers onto music sheets. You could use any type of paper. I didn’t want them perfectly shaped because I think it makes them more realistic. These are about 10″ long and 3″ wide. I then cut them out.
I sprayed a light coat of tea dye on both sides of these feathers using a mix of one cut of hot water and two tea bags that had been seeped for 30 minutes in the hot water. Once I sprayed them I let them dry for a few hours. Instead of tea dye you could also paint the feathers with acrylic or watercolor paint after they are put together.


– Cut a piece of wire about 2-3″ longer than your feather.
– Cut thin strips of paper to wrap the wire.
– Brush on a coat of decoupage on one side of the strips and wrap around your wire wrapping at an angle. I like to wrap more paper around the center of the wire piece to make it thicker than the edges so the vein of the feather is a little more realistic.
– Place wire on the center of the feather.
– Cut a thin feather shape out of your paper, cover one side of this piece with decoupage and adhere it over the wire on the feather. Using your thumb rub this cover securely over the wire.
– Apply another coat of decoupage over the top and bottom of the feather to give it a little extra strength. Let dry.
– Cut slits at an angle on the feather. Crinkle them slightly.
Would they be so pretty if each one was painted lightly with Autumn colors and put all together in a vase or made into a wreath. My mind is going crazy with the possibilities.


Here’s another idea.


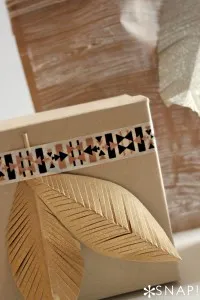
I also may use a smaller version of these feathers as gift tags for Christmas and other occasions.
Come on over to the blog to see what else we’ve been up to. Here’s some of my Halloween decor. I recycled my old decor into a new look. Details here.


I’m so grateful to have Dru on our Creative Team- she always brings so many fabulous projects to share with us!
You don’t want to miss a single thing from Dru and her adorable daughters… make sure to follow them at: www.polkadotpoplars.com or find her on: Facebook// Twitter// Instagram// Pinterest
Happiest of Friday’s to you 🙂
xoxo~ Dru and Ruthie
Recommended Posts

Chef Ruthie
Owners at Cooking With Ruthie
- Easy Fruity Sangria Recipe
- Perfect Cranberry Sauce Recipe
- Pumpkin Spice Caramels Recipe
- Coconut Mango Sweet Rice Recipe
- Lunch Lady Peanut Butter Bars
- Caprese Garlic Bread
- Strawberry Banana Oatmeal Cookies
- Mexican Potato Soup
- Spinach Tomato Orzo Pasta
- Hot Butterscotch Sauce
- Cotton Candy Popcorn Recipe
- Satin Ribbon Flower Tutorial
Leave a comment